| | LemEdit
Tutorial. Welcome to the
LemEdit tutorial. Within the next twenty minutes, you will learn everything
you need to know to use the Lemmings level editor for DOS.
First, you need to be running an operating system that supports DOS, such
as Windows 95 or 98. Then, you need the following files: - LemEdit.exe - The executable
file you need to create and edit levels.
- LemEdit.dat - The data file supporting LemEdit.
- CustLemm.exe - This is a replica of the original Lemming.exe, but
custom made to play the levels from one levelpack in the right order.
- CSTM.dat - The data file supporting CustLemm.exe
- Then, you need most of the files from the original DOS Lemmings game.
LemEdit needs the graphics sets, and CustLemm needs some of the others.
It's best just to put the files mentioned above in the directory containing
Lemmings.
If you have both
the original DOS Lemmings and Oh No More Lemmings, follow the instructions
that came with CustLemm regarding the graphics sets if you haven't already
done so.
Now you have the necessary files, run LemEdit.exe, and after a few seconds,
you should see the 'About' box. 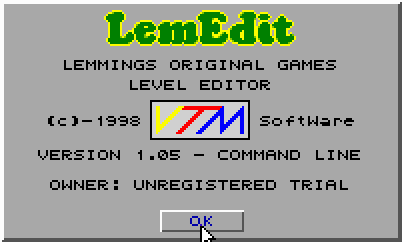
VTM Software is
the company that originally made LemEdit, so you can thank them. But unfortunately,
they are not around anymore, so future updates from them are very unlikely.
Although it says 'OWNER: UNREGISTERED TRIAL', there is no registered version
of LemEdit, and it doesn't have any restricted features or a trial period.
The notice is only there to stop people from selling their levels made
in LemEdit (I think this is right.) Click 'OK', and
you will be presented with a black screen with a toolbar at the bottom. 
On this toolbar
are eight buttons to take you to different menus. These are 'Files', 'Edit',
General', 'Terrain', 'Prefs' (preferences), 'Misc' (miscellaneous), 'Skill
#', and 'Objects'. There is also the CuX reading and the CuY reading.
These tell you the position of the cursor at any given time.
Below this is the scrollbar, which can be used to scroll the level. You
can also do this by moving the cursor to the left or right edge of the
screen, or by pressing the left or right arrow keys. The 'Sp' reading
tells you the position of the screen in relation to the level.
And finally, the 'EXIT' button prompts you before quitting the program.
You can also exit be pressing Esc. Any dialogue or text box can be exited
saving the changes by pressing Enter, or disregarding changes by pressing
Esc, or by the obvious buttons.
Now we will review the menus.
Files. 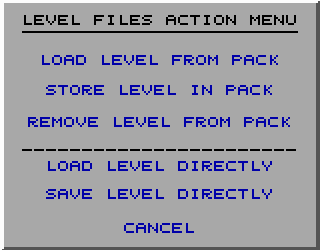
An important thing
to know is there are two different ways a Lemmings level can be saved;
either in a levelpack, or as an individual file. LemEdit can create levelpacks
containing up to ten levels. A levelpack with ten levels is usually from
5 to 10 KB in size, and an individual level file is always 2 KB.
There are six different buttons in this menu. The first three deal with
levelpacks, the next two deal with individual level files, and the last
one exits this menu.
'Load Level from Pack' prompts you to type in the name of the levelpack
in the current directory you wish to load from. The levelpacks from the
original game are from LEVEL000.dat to LEVEL009.dat, and the levelpack
read by CustLemm is levelpak.dat. Once you have typed in the levelpack,
you will be presented with a list of levels in that pack. Click on one,
or scroll with the mouse to select one, and click 'LOAD' to load the level,
or 'CANCEL' to go back. (The previously mentioned keyboard shortcuts also
work here.)
'Store Level in Pack' gives you a box in which to type in the name of
the file you want to wish to save your level in. If it is already a Lemmings
levelpack, you will be presented with a list of levels currently in the
levelpack. Click on one, and click either 'Insert Before', 'Replace',
or 'Insert After'. 'Insert Before' will store the level currently loaded
before the selected level, 'Insert After' will store it after the selected
level, and 'Replace' will replace the selected level with the one currently
loaded. You can also type in the name of a non-existent file, and LemEdit
will create a levelpack with that name containing only one level. More
can be added later if you wish.
'Remove Level from Pack' gives you a box to type in the name of a levelpack,
gives you a list of levels in that pack, and lets you delete ones you
don't want. Please note that CustLemm will crash when trying to load a
non-existent level, and it assumes that all levelpacks contain 10 levels.
'Load Level Directly' lets you type in the name of a directly saved Lemmings
level. These levels are uncompressed, and cannot be played in a DOS Lemmings
game. They can, however, be played in Lemmings for Windows.
'Save Level Directly' lets you type in the filename in which you wish
to save your level in the uncompressed format.
And I think you can guess what 'Cancel' does!
Edit. 
I have to admit
that this is probably the menu I least use, probably because most of the
functions can be accessed by other means.
'Properties' displays the properties to the currently selected terrain
piece, interactive object, or steel area. 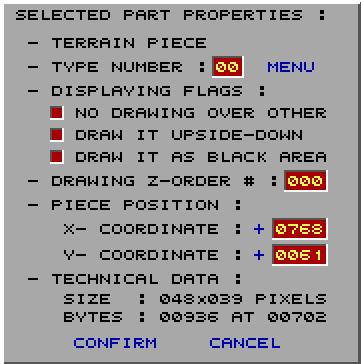
The 'Type Number'
display lets you edit the terrain piece number, either by typing it in,
or by using the 'Menu' button to browse through all the ones available
in the graphics set.
'No Drawing Over Other' lets the terrain piece not be shown when others
are in the way.
'Draw it Upside-Down' flips the terrain piece vertically. Unfortunately,
there is no way to flip them horizontally.
'Draw it as Black Area' makes the terrain piece af empty space with the
same shape. This does nothing over an already empty space, but it's useful
for making holes or smoothing edges. When an interactive object is selected,
this function becomes 'Draw on Ground Only', and causes the selected object
to only appear if it is against a terrain piece, and not against an empty
space. This is mainly useful for one-way arrows.
'Drawing Z-Order' lets you edit the Z coordinates of the terrain piece.
The Z coordinates determine which piece has priority to be drawn. A piece
with a lower Z coordinate will always be drawn behind one with a higher
Z coordinate unless the higher one has 'No Drawing over Other' selected.
The 'Piece Position' controls let you manually edit the X and Y coordinates
of the piece. This can also be done by dragging the piece, or using the
arrow keys when the piece is selected.
Please note that all the functions above except the first one can be accessed
in the toolbar when a piece is selected.
'Replicate' makes a copy of the piece. This can also be done by pressing
'Insert' on your keyboard when the piece is selected. Please note that
a Lemmings level can contain maximum of 400 terrain pieces, 32 interactive
objects, and 32 steel areas. Also, in my experience, interactive objects
besides the trap doors are sometimes ineffective if the Z coordinate is
above 15.
'Remove' deletes the selected piece from the level. This can also be done
by pressing 'Delete' on the keyboard.
All the functions in this section of the 'Edit' box can also be accessed
in the right-click menu of a piece.
'Add steel Area' adds an area of the screen that cannot be penetrated
by a lemming standing on it, and is represented in LemEdit by a flashing
area. The good news is that these pieces can be resized using the controls
in their 'Properties' box, or in the toolbar.
'Clear the Level' removes everything in the level so you can start fresh.
'Bring to Front' puts the Z coordinates of the selected piece at the top
of the list, so it will always appear over others, while 'Send to Back'
puts it behind everything else.
'Select by Order' allows you to select a piece by selecting the type,
either a terrain piece, an interactive object, or a steel area, then the
Z coordinates. This function is useful if you are having trouble selecting
a piece, because it is among many others and has a low Z coordinate.
'Select Through' - Sorry guys, I have never used this function!
'Unselect Part' unselects the current selection. This can be useful if
the level is so built up that you can't find an empty space to click on
instead.
General. 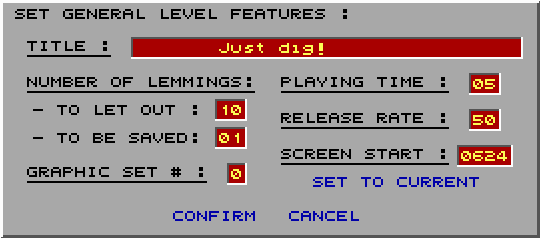
This menu lets
you edit the statistics of the level. This part is self-explanatory.
The 'Title' box lets you change the title of the level. This will appear
in the level introduction screen in the game, and can be a maximum of
32 characters. If the title is quite short, you may want to leave a few
spaces before if you want it to appear centred.
'Number of Lemmings to be Let Out' lets you decide how many lemmings you
want in your level. This value can be from 0 to 80, although setting it
to 0 causes the game to crash!
'Number of Lemmings to be saved' lets you decide how many lemmings need
to be saved in order to pass the level. This value can be from 0 to your
number of lemmings, although I can’t imagine why anyone would make
a level where none have to be saved!
'Graphic Set #' lets you choose the graphics set used, but it doesn't
display the level in LemEdit in that graphics set. To see how the level
will look in a different set, change it in the terrain selection menu.
'Playing Time' lets you choose how long the player has to pass the level
in minutes. This value can be from 0 to 99. A level with 0 minutes will
close before any lemmings come out, and a number of minutes about 9 will
be represented by different characters in the game. Please note that the
art of some levels is the perfectly chosen time limit.
'Release Rate' lets you choose how fast the lemmings will come out the
trap door. This value can be set from 0 to 99. If you have multiple trap
doors, the release rate will apply to them all as a whole, and they will
fall out at a slower rate from individual trap doors.
'Screen Start' lets you choose the starting position of the screen when
the level starts. Clicking 'Set to Current' puts this value at the current
screen position.
Terrain. 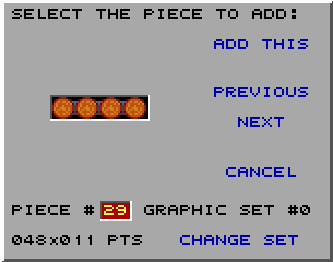
This menu lets
you add terrain pieces to the level. The terrain pieces are numbered from
00 to 63. Click 'Next' to view the next piece in the graphics set, or
'Previous' to view the one before. You can also scroll by pressing the
up and down arrow keys, or if you know the reference number of the piece
you want, you can type it into the 'Piece #' box. Where it says '048x011
PTS' it displays the dimensions in pixels of the selected piece. Click
'Add This' or press Enter to add the piece. Then, if you wish, you can
give it special properties as discussed in the 'Properties' section, and
place it where you want on the screen.
Clicking 'Change Graphics' lets you type in the reference number of the
graphics set you wish to use. When you select a different graphics set,
it will change the entire level. You cannot use pieces or interactive
objects from different graphics sets in one level. Also, not all graphics
sets contain 64 pieces. If you try to select a piece that isn't in the
graphics set, it will say 'Invalid Piece #' where the preview should be,
and you cannot add it.
Prefs. 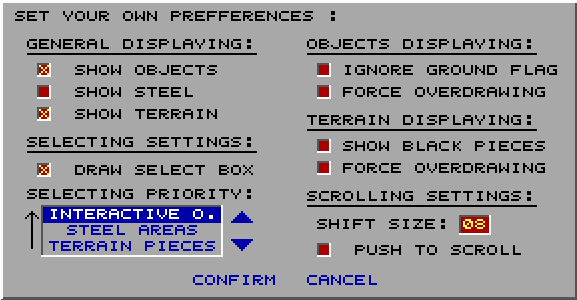
This menu allows
you to set the preferences you wish to use in LemEdit. Any changes you
make to these settings do not change the level in any way, only the way
it is viewed in LemEdit.
'Show Objects', 'Show Steel', and 'Show Terrain' are checkboxes to choose
whether or not to view certain elements in your level in LemEdit. When
a box is unchecked, these parts will not be shown. By default, steel is
hidden until you check 'Show Steel' or you add a steel area. If you add
an item that you have chosen to hide, all other such items will also be
shown.
Steel is represented by flashing, chequered squares, and can sometimes
get annoying unless you are currently adding or moving them. Furthermore,
they do not appear in the game.
'Draw Select Box' decides whether or not a box appears around selected
pieces. This option is by default switched on as it makes it easy to see
which piece is selected.
The 'Selecting Priority' box allows you to decide which type of piece
is selected when you click on an area containing more than one type. Click
on an item in the list and click on the up or down arrows to change this
priority.
'Ignore Ground Flag' causes all interactive objects to be shown in their
entirety when 'Draw on Ground Only' is selected for that object.
'Force Overdrawing' lets all interactive objects be shown above terrain
pieces and interactive objects if 'No Drawing Over Other' is selected
for that object.
'Show Black Pieces' shows any piece normally with 'Draw it as Black Area'
selected.
'Force Overdrawing' does the same as it does for interactive objects.
If 'Force Overdrawing' is selected for both, then interactive objects
will be shown by default over terrain pieces.
'Shift Size' lets you choose how fast in pixels you want the screen to
scroll.
When 'Push to 'Scroll' is selected, you will need to push with the mouse
in order to scroll as opposed to just leaving the cursor on the left or
right edge of the screen.
Misc. 
'About LemEdit'
shows the 'About' box.
'Editor Colors' lets you choose different colour schemes to be used in
the editor. This does not change your level in any way.
'Change Graphics' lets you choose a different graphics set to be used
in the level as discussed in 'Terrain'.
'Fast Screen Jump' allows you to choose the initial screen position when
the level loads in the game or in LemEdit.
'Usage Statistics' displays how many interactive objects, terrain pieces
and steel areas are used in the level. You can have a maximum of 400 terrain
pieces, 32 interactive objects and 32 steel areas in any one level.
'Level Check' looks for items with invalid reference numbers and ones
lying outside the accessible screen area. Such problems may occur when
changing the graphics set of a level, or if the level has been badly edited
in a hex editor. You can choose not to search for certain types of items
with certain problems if you wish by unselecting as appropriate. Click
'Start' to begin the search. If LemEdit finds a problem, it will prompt
you before deleting the invalid items.
Skill #. 
This menu lets
you choose the number of each skills available in the level. Click on
an icon to edit the number and press Enter to confirm, or Esc to cancel.
Each skill allocation can be from 0 to 99.
Objects.
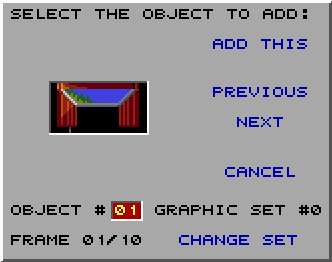
This menu is similar
to 'Terrain', except now you can add interactive objects. Available objects
will include an exit, exit top, trap door, a variety of traps, water,
and one-way arrows. LemEdit lets you browse through 16 object slots, although
no graphics set has more than 12.
Well, that's the toolbar sorted!
There is also a right-click menu to empty spaces and objects, but all
the functions there are explained elsewhere in this document.
Troubleshooting.
Please refer to the original LemEdit tutorial for possible error messages.
Here are a few bugs I have noticed:
Interactive objects with the Y coordinates below 0 (above the top of the
screen) cause the game to crash when scrolling to or from that object.
Interactive objects with the Z coordinates above 15 sometimes don't work.
If it's a trap or water, it may not kill the lemmings, and if it's an
exit, they may not go in. Trap doors, however, still work. So I suggest
prioritising your Z coordinate order in levels with over 15 interactive
objects. Objects with no effect, such as the top to the exit or flags
should have a higher Z coordinate, as should the trap door(s), but the
exit(s) and traps should have lower Z coordinates. Please note that only
I have had this trouble to my knowledge, it may work better with you!
But I suggest testing each interactive object before releasing the level.
Sometimes, even though an exit or a trap is touching the ground, it may
not work because it is too high. If this is the case, try making it a
little lower, or, in the case of an exit, you could put a small block
piece behind it to elevate the lemmings when they walk into it.
No level can have more than four working trap doors.
A lemming won't mine right into ground with right one-way arrows; they
simply take one strike and turn around as they do with arrows pointing
the other way! Although it seems to work okay with mining left into ground
with left one-way arrows. ~
Well, that's about
it. Now all you have to face is the cheap joke awaiting you after closing
LemEdit: 'Thank You for using LEMEDIT . Have a nice DOS !'
If you would like to play Lemmings levels other people have make, please
visit Garjen Software. There may also be other sites from which you can
download Lemmings levelpacks. Why not do an internet search and find out?
If you want your levels to be downloadable to players from around the
world, by all means e-mail the administrator of such sites and they may
upload them for you. Failing that, why not upload them to your web space
if you have one? You can advertise and talk about levels on Garjen
Software and Lemmings
Universe. I look forward to playing your levels!
If you have any comments, suggestions, questions or corrections to offer,
please e-mail me at the address below, or leave a note on the Lemmings
board.
By Ben J Conway.
E-mail: benjconway79@yahoo.co.uk
| | |

